The first nor’easter of the season hits in early December. By the time homeowners notice icicles forming along their eaves and water stains appearing on bedroom ceilings, it’s too late for prevention—they’re managing crisis. Meanwhile, homes equipped with proper winter roofing products weather the same storm without damage. The difference isn’t luck or superior construction. It’s strategic installation of specific products designed to either prevent ice dam formation or protect homes when prevention isn’t perfect.
How Ice Dams Form Along Roof Edges
Understanding ice dam formation explains why specific products work and when to use them. The process follows predictable physics that winter roofing products are engineered to interrupt.
Heat from living spaces rises into your attic. In homes with inadequate insulation or air sealing, this heat warms the roof deck from below. Snow sitting on your roof melts from this warmth, creating water that runs down the slope.
When that meltwater reaches your eaves—the roof overhang extending beyond your home’s heated envelope—it encounters cold surfaces. The eaves remain at outdoor temperature because they’re not warmed by interior heat. The running water hits this cold zone and refreezes instantly.
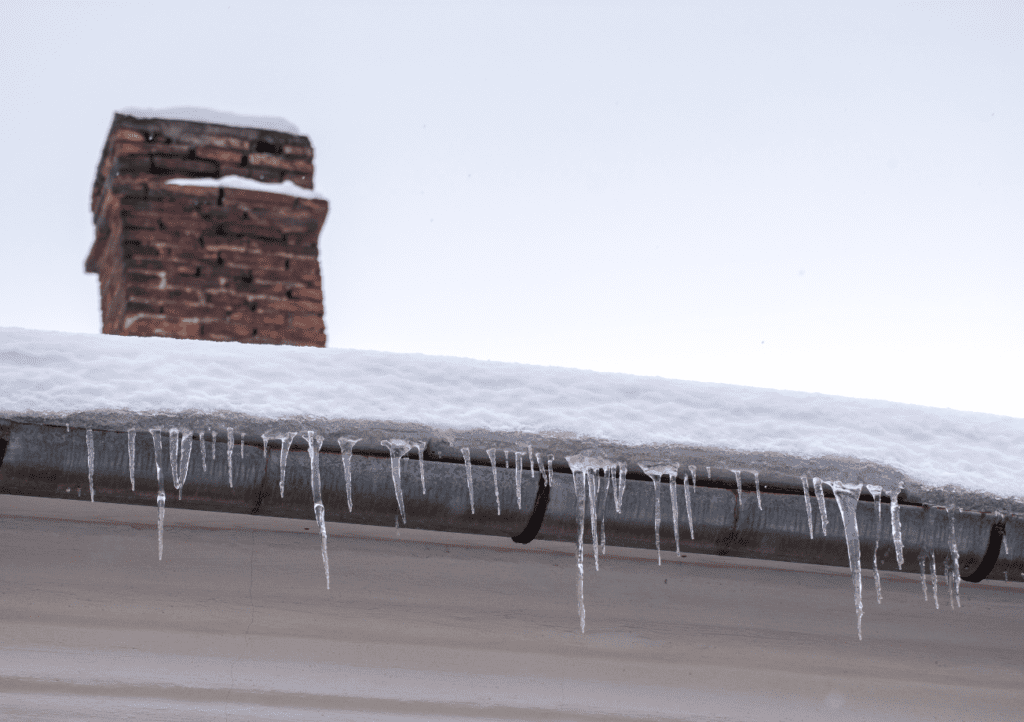
Each freeze-thaw cycle adds more ice to the eave area. What starts as a thin line of ice grows into a substantial ridge. As the ice dam builds, subsequent meltwater backs up behind it. Water pools on your roof surface, sitting for hours or days rather than shedding immediately as roofs are designed to do.
Shingles overlap to shed water moving downward. They can’t prevent water from working upward and sideways. Backed-up water penetrates under shingle edges and through seams, contacting underlayment and eventually the roof deck. From there, it saturates insulation and drips onto ceilings.
Heavy snow loads intensify ice dam formation. More snow means more potential meltwater during each thaw cycle. The weight of accumulated snow also compresses and densifies, creating ice layers that exacerbate the melting and refreezing process. Deep snow insulates your roof, trapping heat underneath and creating warmer roof deck temperatures that melt snow more aggressively.
Ice and Water Barriers: Your First Line of Defense
Ice and water shield represents the most critical winter roofing product for Northeast homes. This self-adhering, waterproof membrane installs directly onto roof decking before shingles, creating a completely waterproof barrier where ice dams form most commonly.
Standard roofing underlayment provides backup protection but isn’t truly waterproof. Water sitting on it for extended periods eventually penetrates through to the roof deck. Ice and water shield uses rubberized asphalt that bonds permanently to decking, creating a seal that prevents any water penetration regardless of how long water sits on it.
When ice dams force water under your shingles, that water hits the ice barrier and stops. The barrier prevents penetration to your roof deck, attic, and interior spaces. The ice dam might still exist on your roof surface, but the damage stops at the shingles instead of destroying insulation, ceilings, and walls.
Building codes require ice barrier at eaves extending at least 24 inches beyond interior walls—typically 3-6 feet up from the roof edge. Professional installations extend coverage beyond code minimums in high-risk areas. Valleys—where two roof planes meet—receive complete ice barrier coverage because they accumulate snow heavily and channel concentrated water flow.
Ice barrier costs $50-100 per roll covering approximately 200 square feet. Extended coverage might add $500-1,500 to roof installation costs, but this one-time expense prevents damage costing tens of thousands to repair.
Heat Cable Systems and Their Protective Role
Heat cables create the second category of winter roofing products. Unlike ice barriers that prevent damage after ice dams form, heat systems prevent ice dams from forming in the first place—when installed and used correctly.
Heat cables are electrical resistance heating elements installed in strategic roof patterns. When energized, they generate warmth that melts ice and snow, creating clear pathways for water drainage. They don’t prevent ice everywhere—they create channels through ice so meltwater can escape.
Effective installations run heat cable in zigzag patterns extending 2-4 feet up from roof edges, through gutters, and down downspouts. This creates a continuous warm pathway from several feet up the roof surface all the way to ground level. Meltwater encounters these warm channels and flows freely rather than refreezing into ice dams.
Heat cables represent active prevention requiring electricity and monitoring. They work well for supplementing adequate insulation and ventilation, protecting specific vulnerable areas, and managing minor ice dam conditions.
They don’t solve severe ice dam problems caused by inadequate insulation. Heat cables cost $0.10-0.25 per linear foot per hour to operate. A 200-foot system running 12 hours daily for 60 days costs $150-450 per season in electricity—ongoing expense that accumulates winter after winter.
Heat cables work best as targeted solutions for problem areas despite adequate insulation, temporary protection while planning permanent improvements, or management of unavoidable vulnerable spots on complex roof designs.
Ventilation Products That Prevent Formation
Proper attic ventilation represents the third critical category of winter roofing products. While less obvious than barriers or heat cables, ventilation addresses the root cause of ice dam formation—warm attic temperatures melting snow from below.
Adequate ventilation maintains attic temperatures close to outdoor temperatures. Cold air enters through soffit vents at eaves, circulates through the attic space, and exits through ridge or gable vents at the peak. This airflow prevents heat accumulation that warms roof decks and melts snow.
When your attic stays cold in winter—matching outdoor temperature—snow on your roof doesn’t melt from below. It only melts from solar radiation and outdoor temperature fluctuations. This dramatically reduces meltwater production and virtually eliminates ice dam formation in properly ventilated attics with adequate insulation.
Continuous soffit vents along eaves provide intake airflow. Ridge vents running the length of roof peaks provide exhaust. The combination creates natural convection that circulates air constantly without mechanical assistance.
Baffles between rafters maintain clear airflow channels from soffit to ridge, preventing insulation from blocking the ventilation pathway. Without baffles, blown insulation often blocks soffit vents, eliminating intake air and destroying ventilation effectiveness.
Ventilation works synergistically with insulation. Proper insulation (R-49 to R-60 in Northeast attics) prevents heat from reaching the attic space. Ventilation removes any heat that does escape. Together, they keep roof decks cold and prevent the melting that creates ice dams.
Why Early Installation Matters Before Peak Winter Weather
The single biggest mistake homeowners make with winter roofing products is reactive installation. They wait until ice dams form, damage occurs, or winter weather arrives before taking action. This timing guarantees either inadequate protection or impossible installation conditions.
Ice and water barrier can only be installed during roof replacement or new construction. Once shingles are on your roof, adding ice barrier requires complete roof removal—you can’t retrofit it onto existing roofs. This means your opportunity to install ice barrier is during planned roof replacement. Miss this window, and you’re stuck with whatever protection your current roof has until the next replacement cycle—potentially 15-20 years away.
Heat cable installation requires safe roof access and temperatures above freezing for proper adhesive function on mounting clips. Installing heat cables in December when ice dams already exist means working in dangerous conditions on icy roofs during the exact weather that makes installation most difficult.
Professional installations happen during fall—September through early November in the Northeast. Contractors can work safely, materials install properly, and systems are tested and ready before the first significant snow.
Adding or improving attic ventilation involves cutting openings, installing vents, and ensuring proper soffit-to-ridge airflow. This work can’t happen when your attic is buried in snow or when subfreezing temperatures make working conditions dangerous. Fall installation allows contractors to work comfortably and homeowners to verify proper function before winter.
Combining Products for Comprehensive Protection
The most effective winter damage prevention uses multiple products addressing different aspects of the problem. Ice barrier provides waterproof backup protection when ice dams occur. Proper ventilation and insulation prevent ice dams from forming in the first place. Heat cables protect specific vulnerable areas despite adequate building envelope performance.
A comprehensive approach includes ice and water barrier at all eaves and valleys during roof replacement, adequate attic insulation (R-49+) with proper air sealing, complete soffit-to-ridge ventilation with baffles, and targeted heat cable installation at chronic problem areas if needed.
This layered protection acknowledges that no single product solves all winter roof challenges.
Your Action Plan
If you’re planning roof replacement within the next few years, prioritize it before another winter without ice barrier protection. If your roof is sound but you experience ice dams, schedule fall attic inspection focusing on insulation adequacy and ventilation function.
If you need heat cable supplementation, schedule installation during September or October. Verify contractors install dedicated GFCI-protected circuits and extend cable onto roof surfaces, not just gutters.
Winter roofing products work, but only when installed proactively during appropriate seasons. Don’t wait for the December storm that proves your roof isn’t ready.